Understanding Database Migrations with NestJS and TypeORM
Posted July 20, 2023

Imagine developing an application and it happens to use a relational database. This means you have a predefined schema with predefined columns and tables. One of the considerations is to create the predefined columns and tables using a GUI such as PGAdmin, PHPAdmin, and MySQL workbench. This is a considerably good approach as it gives you experience and streamlines tasks without using CMD, which can be time-consuming.
However, think of the scalability of the application you are building. Chances are your application will grow in the future and as you scale up. New features will be added, and the data stored in the database will change. This often means you have to alter the tables and databases to match new entries. You need to spend more time ensuring predefined columns and tables match new data entries.
As you continue experiencing this growth, you need a team to help handle and streamline tasks and ensure everything is in place. This scenario means developers need to share a database across the team. Thus, you need a way to track down who made these changes and when. Due to the complexity of data sharing, the team needs to export a database and share it with the team so that the other members can have a copy of the same database.
When performing operations such as the modify and update, every team member must remember to run the script whenever they pull the changes to their computer. When deploying the same code to the production, the team must remember to run these scripts whenever they deploy a new version of the same application. Considering every database is different, you must coordinate the team and remember which scripts to run.
Along with this hustle, a table or whole database is accidentally deleted. You must have the database backup to ensure your application is live without the user noticing something was amiss or experiencing application downtime.
Now you see all the hustle you need to go through to ensure your application is reliable. Would you believe all these problems can be solved with just a few lines of code and running just a few commands? Yes, database migrations help you solve all this. This guide will help you understand migrations and how to implement them to simplify database operations. We will go through the various functionalities involved with migrations in a NestJS application using TypeORM.
Understanding migrations
Migration is a set of scripts with functionalities that help you update your database models. The script will update your database to ensure it matches new entries to the database model. You don’t have to return to the GUI to ensure the database tables match the new data model.
The migration scripts compare with a table inside the database. If the script has new changes, it updates the database table to add the new database model. The migration scripts reside in your project directory. This means you only work on the application without altering the database directly.
As a team, this can be very easy to manage. Every team member can look over the latest migration scripts without exporting database files to every team member’s computer. Once one team member updates the script, the whole team will have the same application database version.
The cool part of migrations is that every migration creates a new version of the changes added to the database. If the current script causes the application to crash, the team can always roll back to the previous stable versions. They work on checking what could be wrong with the recent migration while the application is still up and running.
Understanding migrations in NestJS and TypeORM
NestJS is a framework that allows you to build efficient backend APIs using Typescript. On the other hand, TypeORM is an ORM for JavaScript and typescript. An ORM is an object-relational mapper that simplifies how you interact with a database.
TypeORM has support for multiple databases. It has support for NoSQL and SQL-related databases. In this guide, we will use TypeORM to interact with an SQL PostgreSQL database.
When setting migrations, TypeORM uses synchronize configurations to automatically update your database and make sure it matches the new database schema. However, this method is not always reliable, especially in production applications. If there is a wrong application, chances are you can lose data easily. This feature doesn’t have the previous copy of the previous working schema.
In that case, you are forced to manually set up the TypeORM CLI to execute migration commands.
Let’s see a basic example of how synchronize works. Navigate to your preferred directory and run the following command to initialize NestJS:
nest new postgres-db-migrations
Once the installation is done, proceed to the newly created directory:
cd postgres-db-migrations
Then open your terminal and install the following packages:
- @nestjs/typeorm: Nest’s TypeORM module.
- TypeORM: TypeORM’s official package for Node.js.
- pg: Non-blocking PostgreSQL client for Node.js. npm i @nestjs/typeorm typeorm pg
Finally, initialize the TypeORM CLI using this command:
npx typeorm init
This will create an ormconfig.json at the project root directory. As you can see, the file has synchronize set to true by default as "synchronize": true.
In the ormconfig.json, we will configure TypeORM to connect with the PostgreSQL database as follows:
    [
        {
        "name": "posts_migration_done", // connection name
        "type": "postgres", // database
        "host": "localhost", // connection host
        "port": 5432, // connection port
        "username": "your_db_username", // your database username
        "password": "your_db_password", // your database password
        "database": "demo_posts", // database name
        "entities": ["dist/**/*.entity{ .ts,.js}"], // entity location
        "synchronize": true, // true for development, false for production
        "migrations": ["dist/migrations/*{.ts,.js}"], // migrations location
        "migrationsTableName": "migrations_typeorm", // migrations table name
        "migrationsRun": true, // ability to run migrations
        "cli":{
            "migrationsDir":"src/migrations"
        }
        }
    ]
Make sure you edit the username and password sections to match your database preferences.
To enable TypeORM integration, edit the src/app.module.ts so:
- Import the TypeORM package: import { TypeOrmModule } from ‘@nestjs/typeorm’;
- Add the module in the
importsarray:
    @Module({
        imports: [TypeOrmModule.forRoot()],
        controllers: [AppController],
        providers: [AppService],
    })
Creating a posts entity
In the src directory, create a posts.entity.ts file. In this file, we will define the post entity as so:
- Import the necessary functionalities from
typeorm:
import { Entity, Column, PrimaryGeneratedColumn } from 'typeorm';
- Use the
Entitydecorator to declare anEntityclass and then define thePostclass:
    @Entity()
    export class Post {
    }
- Define the
id,title,descriptionandisDonefields inside thePostclass:
    @PrimaryGeneratedColumn()
    id: number;

    @Column()
    title: string;

    @Column()
    description: string;

    @Column()
    isDone: boolean;
In the src directory, create a migrations directory if it doesn’t exist to host the Posts migrations. Then generate a migration file by running the following command:
npx typeorm migration:create src/migrations/posts
The above command will create a migration file in the posts directory. The file has the following structure:
import { MigrationInterface, QueryRunner } from "typeorm"

    export class posts1652729120943 implements MigrationInterface {

        public async up(queryRunner: QueryRunner): Promise<void> {
            // Commands to perform migration will go here...
        }

        public async down(queryRunner: QueryRunner): Promise<void> {
            // Commands to revert migration will go here...
        }
    }
Creating posts table
On the newly created file under migrations, add an import of Table from typeorm:
import { MigrationInterface, QueryRunner,Table } from "typeorm"
Inside the up function, implement a query to create the posts table:
    public async up(queryRunner: QueryRunner): Promise<void> {
        await queryRunner.createTable(
                new Table({
                    name: 'posts',
                    columns: [
                        {
                            name: 'id',
                            type: 'int',
                            isPrimary: true,
                            isGenerated: true,
                            generationStrategy: 'increment',
                        },
                        {
                            name: 'title',
                            type: 'varchar',
                            length: '255',
                            isNullable: false,

                        },
                        {
                            name: 'description',
                            type: 'varchar',
                            length: '255',
                            isNullable: false,
                        },
                        {
                            name: 'isDone',
                            type: 'boolean',
                            isNullable: false,
                        },
                    ],
                }),
        )
    }
Inside the down function, implement the function to drop the posts table:
    public async down(queryRunner: QueryRunner): Promise<void> {
        await queryRunner.dropTable('posts')
    }
Run the following command to build the application:
npm run build
Ensure that the development server is started:
npm start
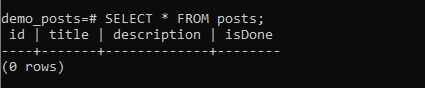
The posts table will automatically be created. Its schema as we have set it will be as follows:
Altering posts table
Suppose the application is in production and there is a need to add a different column. Then you must alter the table.
Start by creating a different migration as earlier:
npx typeorm migration:create src/migrations/posts
In the newly generated file function, edit the up function to alter the table by adding a name column:
    public async up(queryRunner: QueryRunner): Promise<void> {
        await queryRunner.query(
            "ALTER TABLE posts ADD name varchar(255) NOT NULL",
        )
    }
Inside the down function, edit the function to drop the added column:
    public async down(queryRunner: QueryRunner): Promise<void> {
        await queryRunner.query(
            "ALTER TABLE posts DROP COLUMN name",
        )
    }
- Build the application:
npm run build
- Start the application:
npm run start
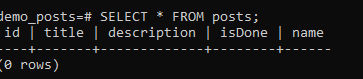
Your posts table schema should be similar to:
Now, with the new found knowledge, learn Prisma ORM with Node.js and PostgreSQL? Prisma allows you to connect to your databases and perform any database-related operation. This will enable you to create applications without manually setting up your database. It migrates and sync it with database of your choice.
Conclusion
Database migration can be a challenging task. And yet an essential part of modern application. You start with one set of data. Then as your application progresses, new features come up. This forces thinking about backward compatibility to ensure your application can roll back to previous database migrations and ensure your application still runs on the most recent updates.
This guide has taught you the strategies you need to implement migrations in the NestJS application. I hope you found it useful and be able to deploy the concept to your future NestJS applications.
Written By: