HOW TO FIX WINDOWS 11 CRASHING ISSUES
Posted July 24, 2023

Have you already upgraded your operating system to the latest Windows operating system (Windows 11)? This will post discuses tips fixing Windows 11 CRASHING ISSUES
Getting frequent unusual pop-ups from Windows, slower computers and frequent system maintenance may be annoying and indicate that your Windows are about to crash. Some of these issues could have been already on your pc before you even updated your operating system—reasons like malware, out-of-date drivers, and problems with your hardware.
Here is how to fix your now-and-then crashing issues
Get the latest system updates
Follow these steps on your Windows 11 PC
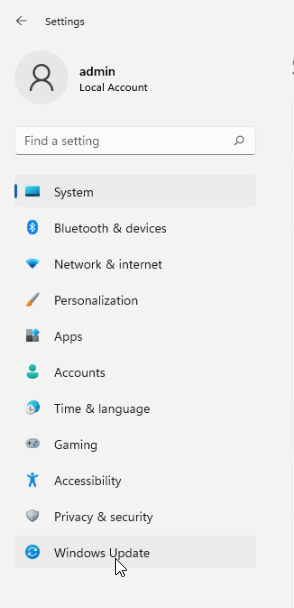
- On your desktop, click the start button and search for settings or click on the Windows key plus “I” to take you to the settings.
- On the settings tab, click on the update and security, which will take you to Windows update.
- Click on the Windows update and check for updates. When the updates are complete, restart your PC
Scan and repair your drivers
If the problem is a software issue, you can quickly fix it by repairing your drivers and returning the machine to its top-notch performance.
- Click on the Windows and R keys to open the Run Command. On the type command search box, type control and click okay.
- Locate and click the recovery button on the control panel. -
- Open the system restore options and click on next.
These will help you see the drives that will roll back. You can also see the programs and files that will be affected at the scan for affected programs option to open a separate window.
Perform a clean boot
To perform a clean boot on your PC
- Hit the Windows key to open the start menu, search
MSConfig. - Click the result appearing on the top to open the system configuration app.
- Select the General tab and click on the specific startup option.
- Click on the service tab, check the hide all Microsoft service option, and click on the Enable all button.
Check for corrupted system files
Corrupted system files may be another reason why your pc keeps on crashing. To check for the corrupted system files:
- Click on the Windows plus “x” and select the command prompt on the list.
- At the command prompt window, type
SFC/scannow and click enter.
The SFC will scan, and if it verifies that the protected file is corrupted, it will then overhaul and change it with the correct copy.
Disable overclocking
Overclocking increases the speed and rate at which a computer functions, exceeding the standard rate that a manufacturer recommends.
To stop your computer’s central processing unit (CPU) from overclocking, you must reverse all of the system settings you made earlier. This is quickly done by entering the bios menu, which is a similar way you use in overclocking your CPU.
You must press a particular key to turn it off as your computer is starting up, mainly f1, f2…. (Your computer suggests). You need to click on the advanced tab from the bios menu and then click on the performance.
It would be best to look for an overclocking option or anything similar. You should turn it off, save the settings, and click yes from the dialogue box. Exit the menu and restart your pc.
Increase the PC’s virtual memory
To increase the virtual memory, click on the Windows key plus the S key, search for performance, and select the adjust performance and appearance of the windows.
In the performance options, select the advanced tab and the change button under the word virtual memory.
Check the Crash logs.
Press the Windows and R keys on your computer to open the Run dialog, type eventvwr, and click OK.
On the left plane that appears, double-click on the Windows logs from the left plane and select the system.
Here you will find the events and select the event as per your crashing time.
I hope you found this helpful!!
More Related Articles:
-
How to Fix Ethernet Connected But Shows No Internet
Just connected your ethernet cable to your PC, tried to browse but got that annoying notification no internet, checked your routers or any other
Jul 24, 2023
-

Ways that you are using your computer wrongly
You might be using your computer and doing things that unknowingly destroy your PC. Here are a few ways in which you might be doing and ruining your
Jul 24, 2023