The Definitive Guide on Creating GrapgQL APIs Using Golang
Posted July 20, 2023

GraphQL is a query language and runtime designed to create APIs as an alternative to REST API architectures. The significant advantage of GraphQL is that it allows you to send a single request to the server and then return all the data in a single response.
This approach reduces the number of requests needed to fetch all the data to improve the performance and efficiency of your APIs. This tutorial will teach you how to create GraphQL APIs using Golang.
Before proceeding, ensure you have Golang set up on your local computer and a MongoDB compass installed as well.
Setting up the Application
When creating an application using Golang, you first need to initialize your project. This allows you to create the files for hosting the project dependencies and module. Open a terminal that points to your project directory and initialize Go as follows:
go mod init graphql-api
This will create a go.mod file with the basic project setting as follows:
module graphql-api

go 1.19.5
Let’s now install the first dependencies of this project. In this guide, you will use gqlgen to simplify how to build Go GraphQL APIs. With gqlgen, you don’t need to create everything from scratch. Gqlgen generates Go code based on your GraphQL schema. To install gqlgen, run the following command:
go get github.com/99designs/gqlgen
For the project ro access the gqlgen dependencies, create a tools.go file as follows:
package tools

import (
_ "github.com/99designs/gqlgen"
)
Use the following command to make the gqlgen dependencies available in the go.mod file:
go mod tidy
Let’s now initialize GraphQL API with gqlgen. Once the application is set, you can use gqlgen to generate your GraphQL boilerplate code using the following command:
go run github.com/99designs/gqlgen init
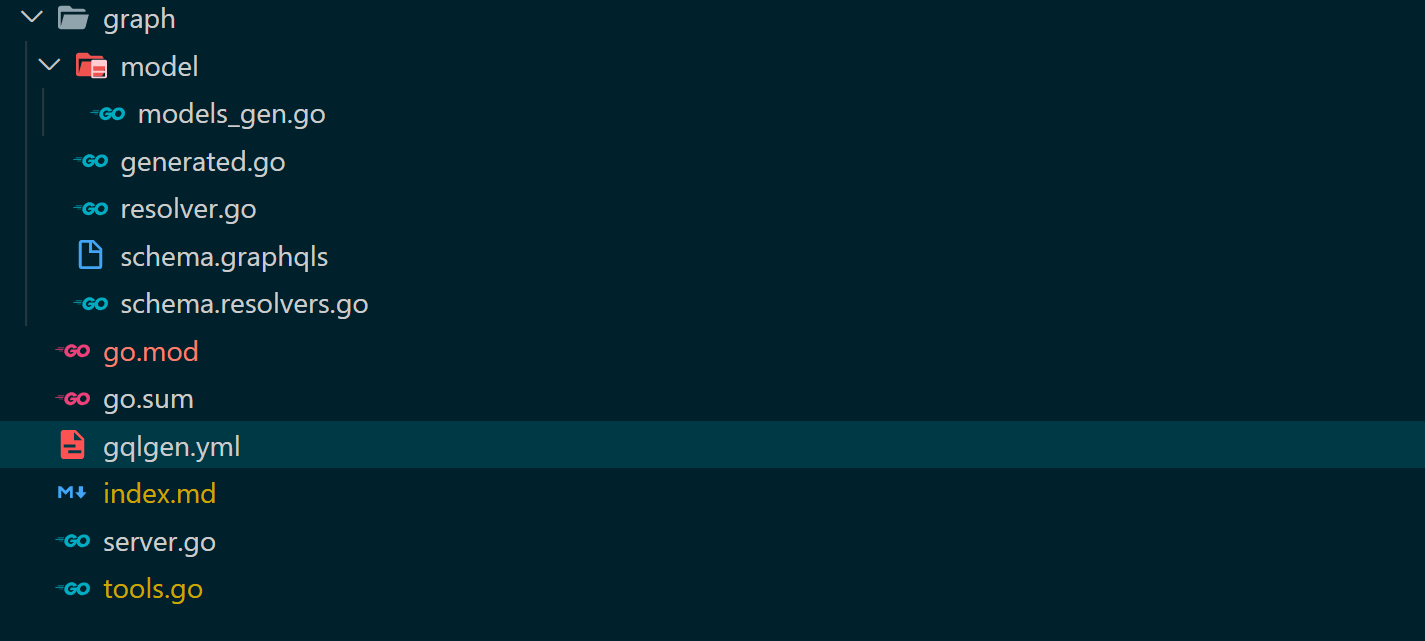
Inside your project folder, you will have a basic Golang application with the following structure:
GraphQL Schema
Let’s create an API to work with GraphQL queries and mutations. To do that, you’ll need to create a GraphQL schema for your API. Schema is a blueprint for GraphQL APIs. It allows you to define the structure of your data using types and fields. Using a schema, you can set up queries and mutations that can be performed on the data structure you have defined.
To create a schema, we will use a blog app example. Navigate to graph/schema.graphqls and define the blog schema as follows:
type Blog{
  id: String!
  title: String!
  content: String
}

input NewBlog{
  title: String!
  content: String
}

type Query {
  blogs: [Blog!]!
}

type Mutation {
  AddBlog(input: NewBlog): Blog!
}
To use this schema across your application, run the following command to generate GraphQL API structs and resolves:
go run github.com/99designs/gqlgen generate
This will update two main files:
graph/schema.resolvers.gowith resolvers for executing the Blog API queries and mutationgraph/model/models_gen.gowith the correct structs based on your schema.
Setting up the database
As stated earlier, this guide will use MongoDB. However, you need the right MongoDB dependencies so Go can communicate with your database. Install the following MongoDB packages
# MongoDB drivers
go get go.mongodb.org/mongo-driver/mongo
# bson for reading, writing, and manipulating data
go get go.mongodb.org/mongo-driver/bson
Once the installation process is completed, process and create a connection to the database using Go. First, create the db folder, then add the db.go file to the new folder. In this file, import the following packages and modules:
package db

import (
    "context"
    "graphql-api/graph/model"
    "log"
    "time"
    "go.mongodb.org/mongo-driver/bson"
    "go.mongodb.org/mongo-driver/bson/primitive"
    "go.mongodb.org/mongo-driver/mongo"
    "go.mongodb.org/mongo-driver/mongo/options"
    "go.mongodb.org/mongo-driver/mongo/readpref"
)
Create a DB struct as follows:
type DB struct {
    client       *mongo.Client
    dbName       string
    dbCollection string
}
This will create a custom struct that will be used to interact with a MongoDB database.
clientfor connecting to the database and performing operations.dbNamerepresents the name of the database that will be created.dbCollectionrepresents the collection’s name that will be created within the database.
To connect to the database, create the following Connect() function and execute your database connection URL as follows:
func Connect() *DB {
    client, err := mongo.NewClient(options.Client().ApplyURI("mongodb://localhost:27017"))

    if err != nil {
        log.Fatal(err)
    }

    ctx, cancel := context.WithTimeout(context.Background(), 10*time.Second)
    defer cancel()

    err = client.Connect(ctx)

    if err != nil {
        log.Fatal(err)
    }

    err = client.Ping(ctx, readpref.Primary())
    if err != nil {
        log.Fatal(err)
    }

    return &DB{
        client:       client,
        dbName:       "graphql-api-db",
        dbCollection: "blogs",
    }
}
Once the connection is established, add a CreateBlog() for adding data to the database. This should be based on the generated model, as demonstrated in the previous steps.
func (db *DB) CreateBlog(input *model.NewBlog) *model.Blog {
    collection := db.client.Database(db.dbName).Collection(db.dbCollection)
    ctx, cancel := context.WithTimeout(context.Background(), 30*time.Second)

    defer cancel()
    res, err := collection.InsertOne(ctx, input)

    if err != nil {
        log.Fatal(err)
    }

    return &model.Blog{
        ID:      res.InsertedID.(primitive.ObjectID).Hex(),
        Title:   input.Title,
        Content: input.Content,
    }
}
This will execute the database collection created in the Connect(). Once the collection is established, the query InsertOne will be executed to add a new blog entry based on the model structs. The CreateBlog() will be implemented later to execute GraphQL mutations.
To fetch blog data from the database, create the GetAllBlogs() function to execute Find, which is responsible for getting data from your databse collection as follows:
func (db *DB) GetAllBlogs() []*model.Blog {
    collection := db.client.Database(db.dbName).Collection(db.dbCollection)
    ctx, cancel := context.WithTimeout(context.Background(), 30*time.Second)

    defer cancel()
    cur, err := collection.Find(ctx, bson.D{})

    if err != nil {
        log.Fatal(err)
    }

    var blogs []*model.Blog
    for cur.Next(ctx) {
        var blog *model.Blog
        err := cur.Decode(&blog)

        if err != nil {
            log.Fatal(err)
        }

        blogs = append(blogs, blog)
    }
    return blogs
}
The GetAllBlogs() will be implemented later to execute GraphQL queries.
Implementing resolvers
A resolver allows you to fetch the data for a specific field in a GraphQL API. When you make a query or a mutation, the GraphQL server will call the appropriate resolver function for each field in the query or mutation. The resolver function will then fetch the data for that field and return it to the client.
To implement resolvers, navigate to the graph/schema.resolvers.go file and add the following changes:
First, ensure you have the following imports included:
import (
    "context"
    "graphql-api/db"
    "graphql-api/graph/model"
)
- Edit the
AddBlogresolver to execute the blog mutations resolver as follows:
// AddBlog is the resolver for the AddBlog field.
func (r *mutationResolver) AddBlog(ctx context.Context, input *model.NewBlog) (*model.Blog, error) {
    return db.Connect().CreateBlog(input), nil

}
- Edit the
GetAllBlogsresolver to execute the blog queries resolver as follows:
// Blogs is the resolver for the blogs field.
func (r *queryResolver) Blogs(ctx context.Context) ([]*model.Blog, error) {
    return db.Connect().GetAllBlogs(), nil
}
Testing
Up to this point, the application ia ready. To test it, you need to execute the previously generated server.go file as follows:
go run server.go
This will execute and run the application on http://localhost:8080/. Opening this URL on the browser will allow accessing the GraphQL playground to interact with the GraphQL API.
To test the mutation for adding a blog to the database, use the GraphQL playground to execute the following:
mutation AddBlog {
  AddBlog(
    input: {
      title: "Test Post",
      content: "This is an example test post",
    })
  {
    id
    title
    content
  }
}
Execute the above query, and you should get the following response:
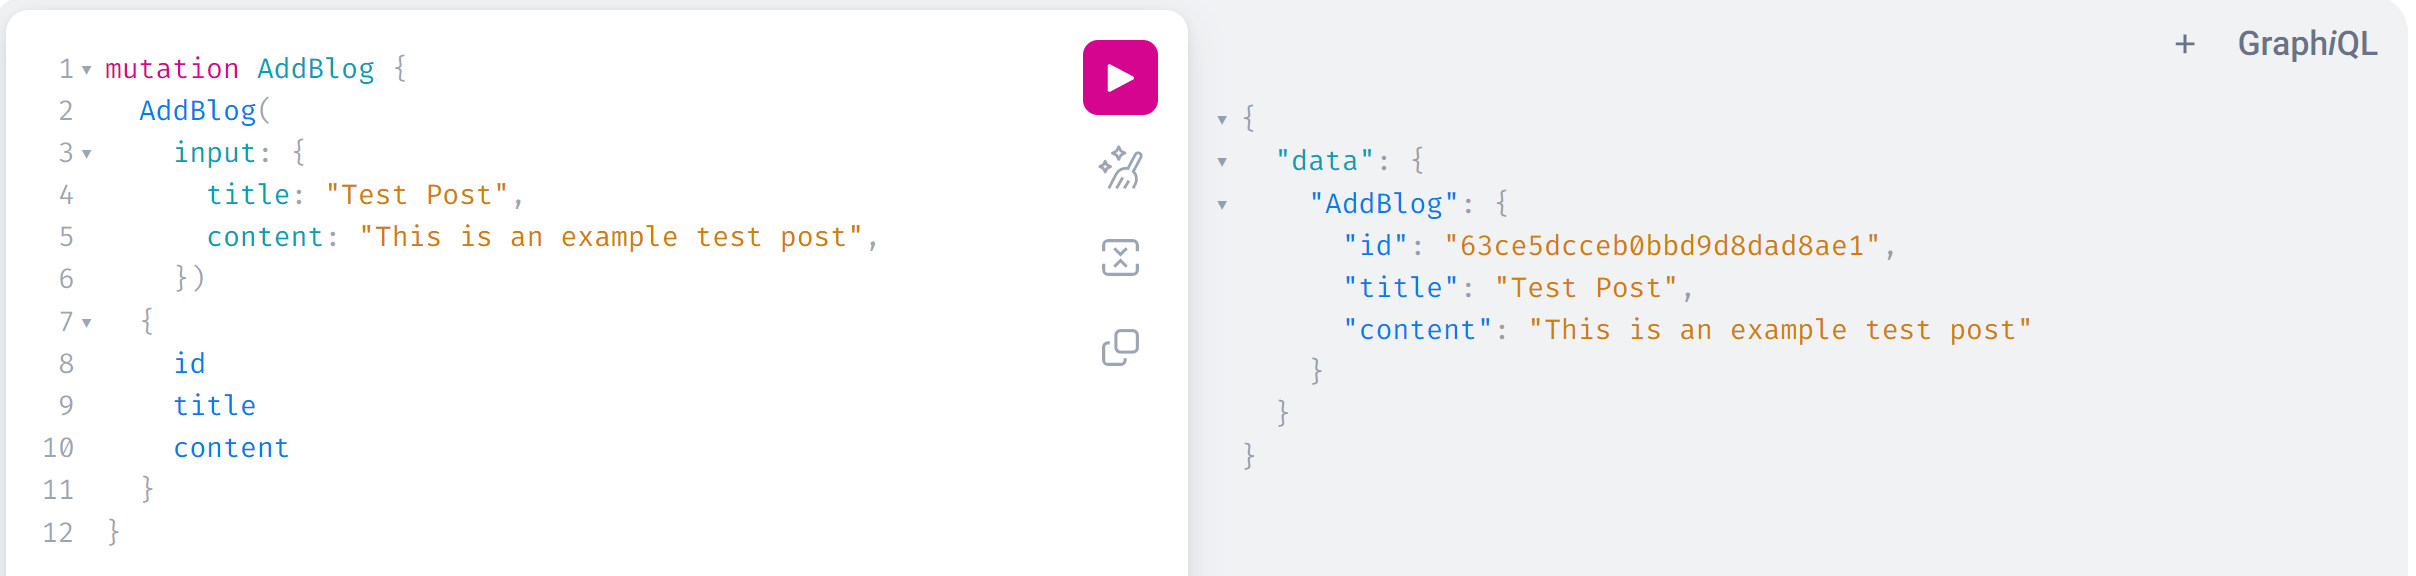
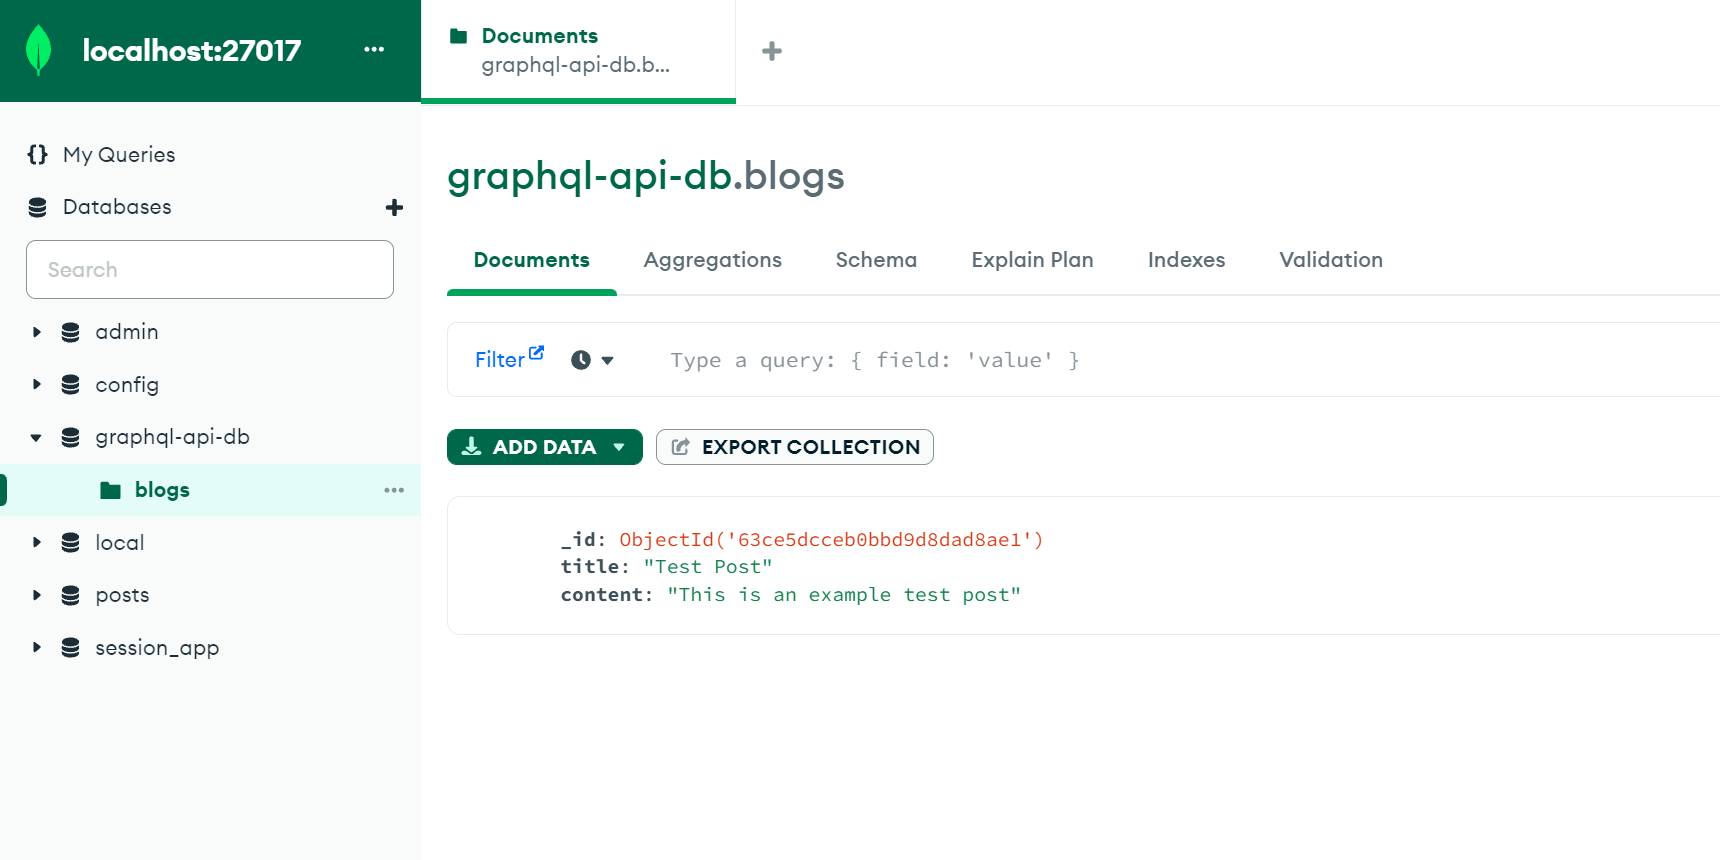
This show that the blog was successfully added to the database. You can confirm this on your database as follows:
To fetch any added blog, execute the following query:
query Blog{
  blogs{
    title
    content
  }
}
This will fetch available posts as follows:

Now that you have mastered How to Create GrapgQL Apis Using Golang, why not dive deeper into Consuming GraphQL API with React.js?
Wrapping up
Up to this point, you have been able to execute both mutations and queries for your GraphQL API. This guide created a GraphQL API using Golang, and I hope you found it helpful.
Written By:
Joseph Chege
More Related Articles:
-

Using Prisma ORM with Node.js and PostgreSQL
Prisma is a Node.js and typescript ORM. an ORM that means Object Relational Mapping tool that can communicate with databases such as MongoDB, MySQL
Jul 29, 2023
-

Guide to Creating CRUD APIs in Flask
Flask is a web framework for building web applications using Python. It is known for its lightweight and simple design. This makes it easy to get
Jul 28, 2023
-
How to Create React Apps With Node.js Express Server
React is a JavaScript-based framework for building fast and interactive UIs for mobile and web apps. Currently, it’s the most popular JavaScript
Jul 27, 2023
-
Implementing Laravel User Authentication Tutorial With Code Examples
In this article, we will implement authentication on a Laravel project while using a LoginRadius Sdk.
Jul 22, 2023