Guide to Creating CRUD APIs in Flask
Posted July 28, 2023

Flask is a web framework for building web applications using Python. It is known for its lightweight and simple design. This makes it easy to get started with and flexible to build upon. Flask takes a more minimalistic approach and allows you to choose which components and libraries they want to use in your application. This allows you to build their application exactly how they want it. This article will go through the steps of setting up a CRUD Restful API using Flask.
Prerequisites
To continue in this article, it is helpful to have the following:
- Python 3.0 installed on your computer.
- Postman installed on your computer. You will you Postman to test if the API works as expected.
- Prior experience working with Python will be essential.
Setting up the database connection
In this guide, you will use an SQLite database to interact with the application data. Let’s set up a database to initialize a connection so that the application can be able to make the necessary tasks.
Firts, ensure you are in the directory where you want the Flask to live. Inside the directory, create a schema.sql file that will host the schema of the posts table. Here is the SQL for creating the table should look like. So go ahead and add it to the schema.sql file as follows:
CREATE TABLE IF NOT EXISTS `posts` (
    id INTEGER PRIMARY KEY AUTOINCREMENT,
    title TEXT NOT NULL,
    description TEXT NOT NULL,
    created_on TIMESTAMP NOT NULL DEFAULT CURRENT_TIMESTAMP
);
In the same directory, create an init_db.py file. This file will host the initialization setup to execute the above schema. First, this will initialize the database and run the schema defined above on it to build the database table:
import sqlite3 # import SQLite3

connection = sqlite3.connect('database.db') # define the connection file

with open('schema.sql') as f:
    connection.executescript(f.read()) # execute the schema on the file
connection.close() # close the database connection
Here, sqlite3 will create a database.db file as the SQLite database and execute the schema as such.
Setting up the application
The database is ready. Let’s dive in and build the Flask application to communicate with this setup. Go and open a terminal that points to your project folder and install Flask as follows:
pip install flask
Inside the project folder, create an app.py file. Here, let’s first build a connection to communicate with the database. In the app.py :
- Import the necessary packages:
import sqlite3
from flask import Flask,jsonify,request
- Initialize the Flask application:
app = Flask(__name__)
- Define and instantiate the database connection to the SQLite
database.dbfile:
def db_connection():
    db_con = sqlite3.connect('database.db') # connect to the SQLite file
    return db_con
- Run the application in debugging mode:
if __name__=='__main__':
    app.run(debug=True)
Getting posts
With the above connection, Flask can now communicate with the database. Let’s check how Flask can fetch data. In your app.py file, add the following changes:
First, create a route that allows you to access the APi and make a GET request. Therefore, define a posts route and add the GET method as follows.
@app.route('/posts',methods=["GET"])
To execute this route, define the function for handling the route:
def index():
    db = db_connection() # get the db connection
    if(request.method == 'GET'): # confirm it is a GET request
        posts = db.execute('SELECT * FROM posts').fetchall() # fetch the posts
        db.close() # close the connection
        response = {
            "success":True,
            "posts" : posts
        }
        return jsonify(response) # return a json response
This will execute a SELECT * FROM posts using the fetchall() method. This way, Flask will send a request and return a response with the posts available in the database. To check if this is working as expected, ensure that the Flask development server is running using the following command:
python app.py
Open Postman to test the API. From your Postman, send a GET request to http://127.0.0.1:5000/posts. Based on whether you have posts on the database, the response of this method should be similar to the following:
If you dont have a post, you will get "success":True, with an empty array of posts.
Creating a post
If you dont have any posts on the database, let’s check how to use Flask to add data to tha database. In the app.py file, you will add the following changes:
In the posts route created in the above GET example, add a POST method to allow you to POST request as follows:
@app.route('/posts',methods=["GET","POST"])
Inside the function for handling the route, which is index(), add an elif statement to check if the request method the API is executing is of POST type as follows:
elif(request.method == 'POST'):
    request_data = request.get_json() # get the JSON payload
    title = request_data['title'] # get the title
    description = request_data['description'] # get the description
    posts = db.execute('INSERT INTO posts (title,description) VALUES (?,?)',(title,description)) # query formation
    db.commit() # query execution
    db.close() # close the db connection
    response = {
        "success":True,
        "message":"Post added successfully"
    }
    return jsonify(response) # return json response
This will allow Flask to send a 'INSERT INTO posts (title,description) VALUES (?,?) query that adds data to the database. Flask will send a JSON payload to execute the INSERT query. To test this example, send a POST request to http://127.0.0.1:5000/posts from your Postman.
Configure a Content-Type of application/json in the headers and configure a similar JSON payload and send as follows:
{
    "title":"Post one",
    "description":"Content of post one"
}
The response of this method should be similar to the following:

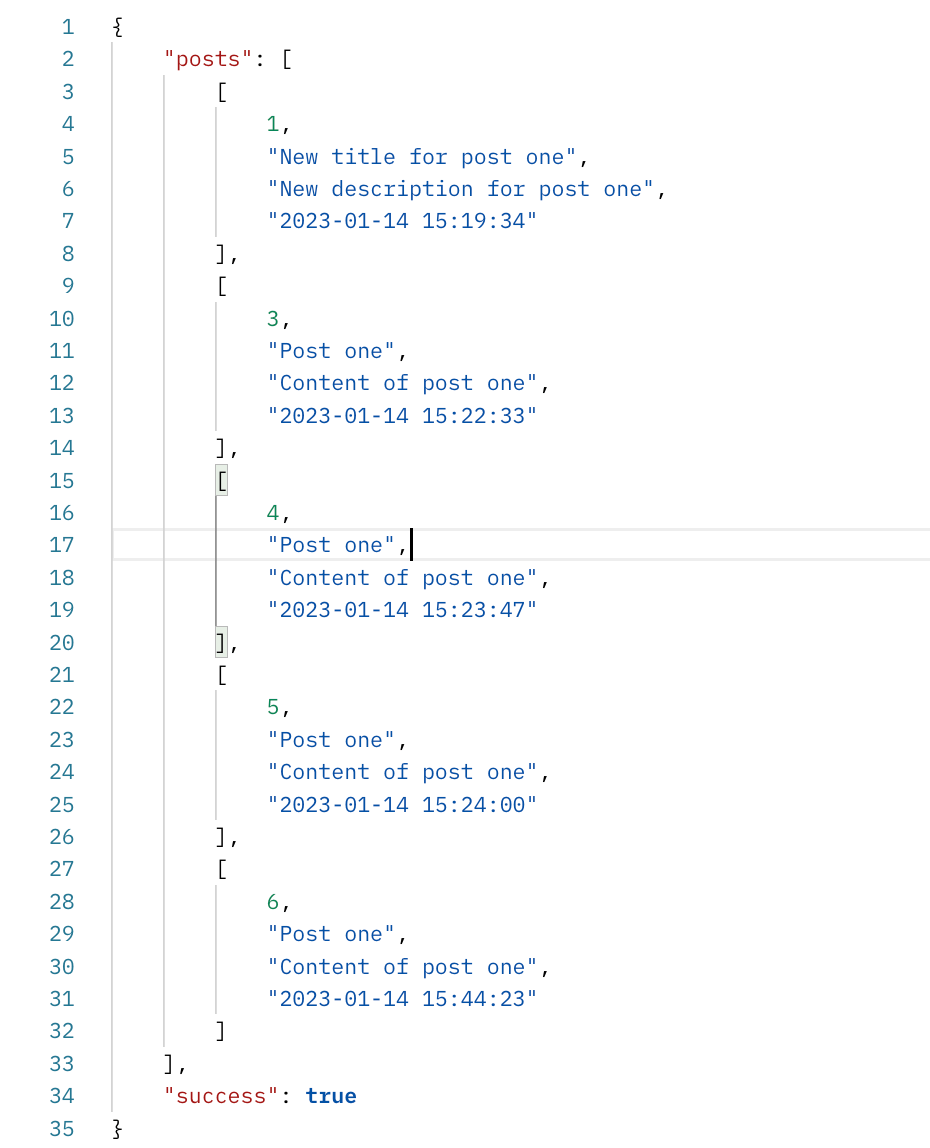
This should add the above post to the database. You can also send a GET request to http://127.0.0.1:5000/posts to test if the API is able to fetch the data you have added:
Updating a post
Likewise, you update the values of an existing entry. Let’s handle that using Flask. In the app.py add the following further changes:
In the posts route, add a PUT method. This will allow you to send a request to change the existing data. Add PUT as follows:
@app.route('/posts',methods=["GET","POST","PUT"])
Inside the index() function handling the route, define an else if statement when the request method is PUT.
elif(request.method == 'PUT'):
    request_data = request.get_json() # get the payload data
    title = request_data['title'] # title
    description = request_data['description'] # description
    post_id = request.args.get('id') # post id
    if(post_id is None): # when post id is none
        return jsonify({
            "success":False,
            "message":"Post ID is required"
        })
    else:
        db.execute('UPDATE posts SET title=(?),description=(?) WHERE id = (?)',(title,description,post_id)) # query formation
        db.commit() # query execution
        db.close() # close db connection
        return jsonify({ # send json response
            "success":True,
            "message":"Post updated successfully"
        })
To update a post, you will need to get the id of the specific post that you want to update. Once Flask is able to grab tha send the UPDATE query as shown above.
From your Postman, send a PUT request to http://127.0.0.1:5000/posts?id=the_id_of_the_post, compose a JSON payload similar to the one below and then send it:
{
    "title":"New title for post one",
    "description":"New description for post one"
}
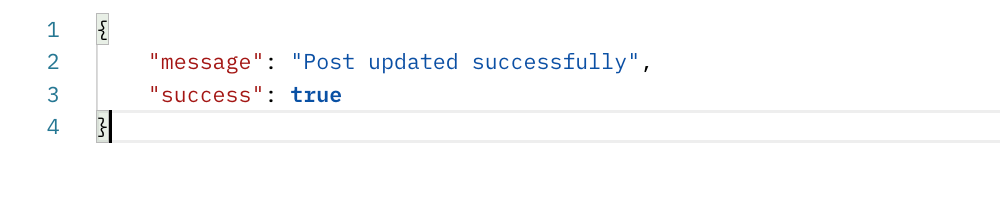
The response of this method should be similar to the following:
Note: In the http://127.0.0.1:5000/posts?id=the_id_of_the_post endpoint, you will need to change the parameter the_id_of_the_post with the id of the specific post you want to update.
Deleting a post
To delete an existing post, add the following changes in the app.py file:
In the posts route, add a DELETE route as follows:
@app.route('/posts',methods=["GET","POST","PUT","DELETE"])
In the index() function that handles the route add an if check if the request method is DELETE:
elif(request.method == 'DELETE'):
    post_id = request.args.get('id') # get the post id

    if(post_id is None): # check if the post id is none
        return jsonify({
            "success":False,
            "message":"Post ID is required"
        })
    else:
        db.execute("DELETE FROM posts WHERE id=(?)",(post_id)) # query formation
        db.commit() # query execution
        db.close() # close the db connection
        return jsonify({
            "success":True,
            "message":"Post deleted successfully"
        })
From your Postman, send a DELETE request to: http://127.0.0.1:5000/posts?id=id_of_post_to_be_deleted. The response of this method should be similar to the following:

Note: In the http://127.0.0.1:5000/posts?id=id_of_post_to_be_deleted endpoint, you will need to replace the parameter id_of_post_to_be_deleted with the id of the specific post you want to delete.
Now, you have mastered Creating CRUD APIs in Flask, why not dive deeper into Python and learn how to Build Django RESTful CRUD APIs using the Django REST framework? Or get wilder learning this Complete Guide to Creating Flask APIs with React apps and take your skills to new heights.
Conclusion
This guide has helped create a CRUD API using Flask. I hope you find it useful as well as insightful.
Written By:
Sarah Peter
More Related Articles:
-

Using Prisma ORM with Node.js and PostgreSQL
Prisma is a Node.js and typescript ORM. an ORM that means Object Relational Mapping tool that can communicate with databases such as MongoDB, MySQL
Jul 29, 2023
-
How to Create React Apps With Node.js Express Server
React is a JavaScript-based framework for building fast and interactive UIs for mobile and web apps. Currently, it’s the most popular JavaScript
Jul 27, 2023
-
Implementing Laravel User Authentication Tutorial With Code Examples
In this article, we will implement authentication on a Laravel project while using a LoginRadius Sdk.
Jul 22, 2023
-

The Definitive Guide on Creating GrapgQL APIs Using Golang
GraphQL is a query language and runtime designed to create APIs as an alternative to REST API architectures. The significant advantage of GraphQL is
Jul 20, 2023