Ultimate Guide to Building Node.js REST APIs using TypeScript
Posted July 19, 2023

Typescript can be defined as a strict syntactical superset of JavaScript. It allows you to use features such as static typing to help you detect errors before compiling time. Typescript is more of JavaScript with added features. Any library that Node.js JavaScript uses can be applied with Typescript. However, Typescript has to transcompile to JavaScript to be executed. This article will help you will learn how to execute Typescript in Node.js. Using this setup, you go through the steps of setting up a Express Node.js RESTFul API using Typescript and a MongoDB database.
Prerequisites
To continue in this article, it is helpful to have the following:
- Node.js installed on your computer.
- Postman installed on your computer.
- Prior experience working with TypeScript.
- MongoDB is installed on your computer. Alternatively, you can have a MongoDB Atlas set up.
Setting up the Application
First, initialize a Node.js Express project that TypeScript need using an NPM command as follows:
npm init -y
This will create files to save project depending and executions scripts. To create a Node.js RESTFul API using Typescript, you need to install several dependencies:
To install the dev dependencies, use the following packages:
- Typescript - For Typescript support.
- @types/node - For Typescript declarations for Node.js.
- Nodemon - For managing the Noe.js server.
- ts-node - For transpiling code Typescript to Javascript.
To install the above packages, run the following command in your project directory:
npm install --save-dev typescript @types/node nodemon ts-node
To allows the application to execute Typescript, initialize Typescript using this command:
npx tsc init
This guide will use core dependencies for implementing the RESTFul aspect of this application:
- Express - For setting up the Node.js TypeScript web server.
- Mongoose - For connection with MongoDB.
Run the following command to install them:
npm i --save express @types/express mongoose @types/mongoose
It’s good to note that the following command will add two additional dependencies. These are:
- @types/express
- @types/mongoose
These packages allow you to access the Typescript safe code associated with each package. When creating an application with Typescript allows ensuring, you install theTtypescript support of each parent package using the @types annotation as shown above:
To configure how to run the application, add a script for starting the development environment in the scripts section of the package.json file:
"dev":"nodemon app.ts"
Setting up Express Node.js Typescript Server
In your project directory, create an app.ts file. In this file, you set up a Node.js Typescript server as follows:
- Import the necessary packages you require for your application:
import express, { Express, Request, Response } from 'express';
import mongoose from 'mongoose';
- Initialise an express instance so that the application can access express methods:
const app:Express = express();
- Allow JSON data for payload. This will be useful when sending requests or receiving responses from the server. The data will be encoded in JSON format as follows:
app.use(express.json());
app.use(express.urlencoded({extended:false}));
- Define a port to run the application on. This port will be used to expose the API locally:
const PORT = process.env.PORT || 3000;
Adding a TypeScript Express MongoDB Connections
In the app.ts, let’s create methods for establishing a connection to the database. Note the following connection uses a locally installed MongoDB.If you are using MongoDB cloud, ensure the connection string mongodb://localhost:27017/notes reflects accordingly:
Go ahead and define a function to connect to the mongo database locally:
const connectDb = async ():Promise<String> => {
    try{
        await mongoose.connect('mongodb://localhost:27017/notes',{
        });
        return "Database connected successfully"
    }catch(error:any){
        throw new Error(error).message;
    }
}
Define a function to start the application as follows:
app.listen(PORT, async () => {
    try{
        await connectDb();
        console.log('Database and server running on port '+PORT);
    }catch(error){
        console.log('Server started on port '+PORT);
        console.error(error);
    }
});
Setting up a TypeScript Express Noe.js Notes Model
This guide will use Notes to demonstrate how to build Node.js Typescript REST API. Therefore, you will be required to create a model.
In Typescript, models define the structure and behavior of data using classes or interfaces. They are used to define the data’s shape, the properties’ types, and the methods that can be used on that data. A model defines the properties you need to create a Typescript application.
Typescript will use the model you create throughout the application to ensure that all instances have the same properties. In this case, a notes app will have properties such as a title and description. These properties will be used to carry out the CRUD methods as required. This will also be used to validate data before it is saved to the database or sent to the server.
Let’s dive in and create a Notes model. In the project directory, create a directory and name it models. Inside the models directory, create a Note.ts file. In the Note.ts file:
- Import the
Schema, andmodelfrom mongoose:
import {Schema,model} from 'mongoose';
- Define the schema for a note with the required properties, type, and required:
const NoteSchema = new Schema({
    title:{
        type:String,
        required:true
    },
    description:{
        type:String,
        required:true
    },
    createdOn:{
        type:Date,
        default:new Date().getTime()
    }
});
This will ensure the model meet meets certain criteria for the notes data. It will be an application blueprint.
Define the model and export it as follows:
const noteModel =  model('notes',NoteSchema);
export default noteModel;
Getting All Notes Using TypeScript Express And MongoDB
Let’s now create a method for fetching data from the database using Typescript. Inside the project directory, create a controller.ts file. The file will host the functionalities to get all notes and add, update, and delete a note.
In the controller.ts, import the necessary packages:
import {Request,Response} from 'express';
import Note from './models/Note';
Define a Typescript interface for the API response:
interface NoteResponse {
    success:boolean,
    message:string,
    data:[]
}
- Define a
NotesControllerclass: You will add functionalities to getting all notes, creating, updating, and deleting a note inside this class:
class NotesController {
}
- Inside the
NotesControllerclass, define a method for getting the notes as follows:
 async getNotes(req:Request,res:Response):Promise<Response<NoteResponse>>{
    try{
        const notes = await Note.find(); // get the notes
        return res.json({ // return a JSON response.
            success:true,
            message:"The notes",
            data:notes
        })
    }catch(error:any){
        return res.json({ // return an error response
            success: false,
            message: new Error(error).message
        })
    }
}
To interact with the getNotes(), function, you need a route/endpoint to send requests and receive data response. Inside the project directory, create a routes.ts file to host the an API routes:
In the routes.ts file, import the necessary packages:
import express,{Router,Request,Response} from 'express';
import NotesController from './controller';
Define the router:
const router:Router = express.Router();
Instantiate the notes controller:
const controller = new NotesController();
Define a router for getting the notes and assign it to the getNotes() function as defined in the controller.ts file:
router.get('/', (req:Request,res:Response) => controller.getNotes(req,res));
Export the router as follows:
export default router;
To execute the route, navigate to the app.ts and import the routes.ts file:
import routes from './routes';
Configure the route for getting notes as follows:
app.use('/api/notes',routes);
Let’s test whether this works based on the notes model created above. But first. Ensure that your development server is running using the following command:
npm run dev
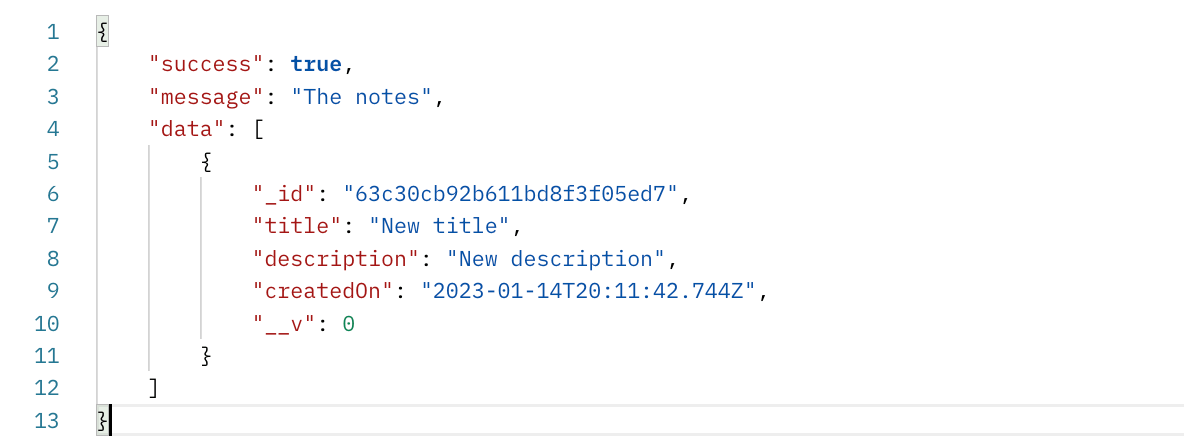
Send a GET request from your Postman to http://localhost:3000/api/notes. Based on the number of notes available in the database, your response should be as follows:
Using TypeScript Express to Add a Note to MongoDB
Perhaps you didn’t get any data in the above data array? Let’s create a route to help add data to the database. In the controller.ts file, inside the NotesController class, define a function for adding a note as follows:
async addNote(req:Request,res:Response):Promise<Response<NoteResponse>>{
    try{
        const {title,description} = req.body;
        if(title && description){
            let note = await Note.create({
                title,
                description
            });
            return res.json({
                success: true,
                message: "Note created successfully",
                data:note
            })
        }else{
            return res.json({
                success:false,
                message:"Title and Description of Note required"
            });
        }
    }catch(error:any){
        return res.json({
            success:true,
            message:new Error(error).message
        });
    }

}
In the routes.ts, configure a route for adding a note, and it’s addNote() controller function:
router.post('/add-note', (req:Request,res:Response) => controller.addNote(req,res));
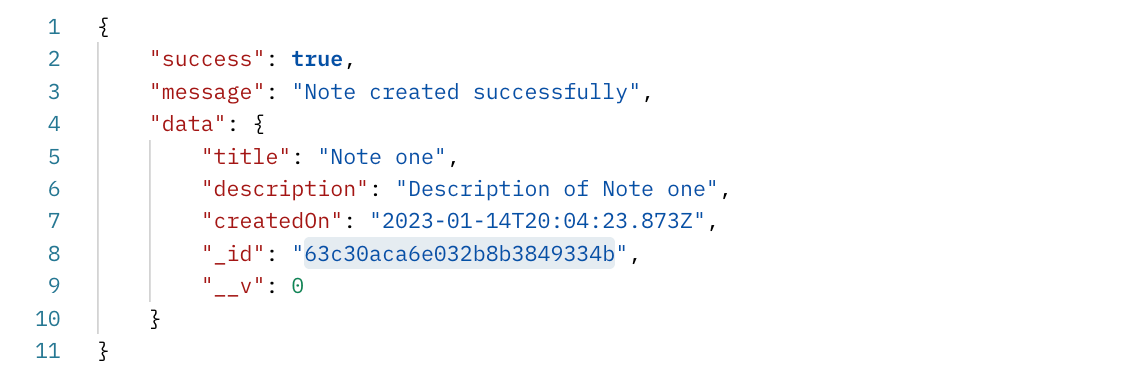
Send a POST request from your Postman to http://localhost:3000/api/notes/add-note. Your JSON payload should be similar to:
{
    "title":"Note one",
    "description":"Description of Note one"
}
You should receive the following response based on the note you have added:
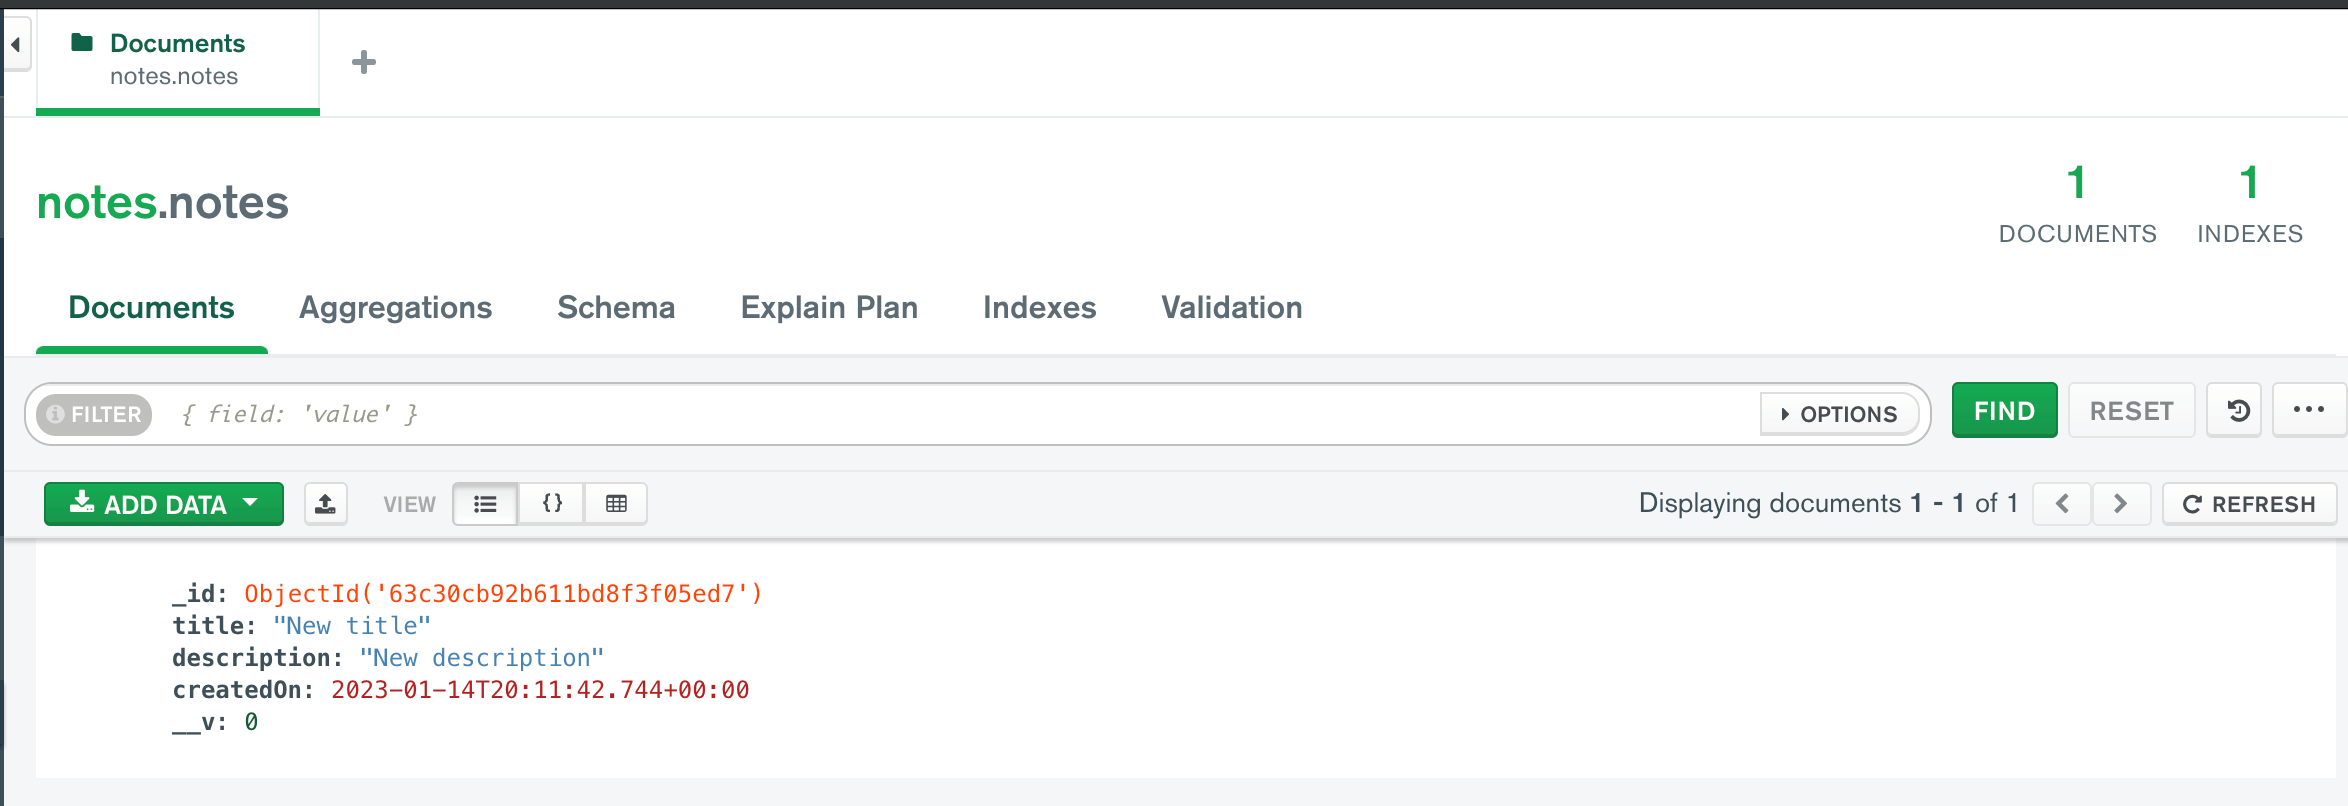
Note: These changes should reflect in your database as well:
Likewise, you can send a GET request to http://localhost:3000/api/notes to test if the API can fetch the added note.
Using TypeScript Express to Update a Note to MongoDB
To update a note, navigate to the controller.ts. Inside the NotesController class, create a function for updating a note as follows:
async updateNote(req:Request,res:Response):Promise<Response<NoteResponse>>{
    try{
        let {id} = req.query;
        let {title,description} = req.body;
        let note = await Note.findOne({_id:id});
        if(!note){
            return res.json({
                success:false,
                message:"Note does not exist"
            })
        }else{
            await Note.updateOne({_id:id},{
                $set:{
                    title,
                    description
                }
            });
            return res.json({
                success:true,
                message:"Note updated successfully"
            })
        }
    }catch(error:any){
        return res.json({
            success:true,
            message: new Error(error).message
        })
    }
}
In the routes.ts, add a route for updating a note and connect the controller function to it:
router.put('/update-note', (req:Request,res:Response) => controller.updateNote(req,res));
Send a PUT request from your Postman to http://localhost:3000/api/notes/update-note?id=_id_of_post_to_be_updated.
Ensure your JSON payload is similar to the following:
{
    "title":"New title",
    "description":"New description"
}
Note that the _id_of_post_to_be_updated should be the id of the note you want to delete based on the database:
You should receive the following response if the note was successfully updated:

Using TypeScript Express to Delete a Note to MongoDB
To delete a note, inside the NotesController, add a function for deleting a note:
async deleteNote(req:Request,res:Response):Promise<Response<NoteResponse>>{
    try{
        let {id} = req.query;
        let note = await Note.findOne({_id:id});
        if(!note){
            return res.json({
                success:false,
                message:"Post not found"
            })
        }else{
            await Note.deleteOne({_id:id});
            return res.json({
                success:true,
                message:"Post deleted successfully"
            });
        }
    }catch(error:any){
        return res.json({
            success:false,
            message:new Error(error).message
        })
    }
}
In routes.ts, define a route for deleting and connect it to the controller function:
router.delete('/delete-note', (req:Request,res:Response) => controller.deleteNote(req,res));
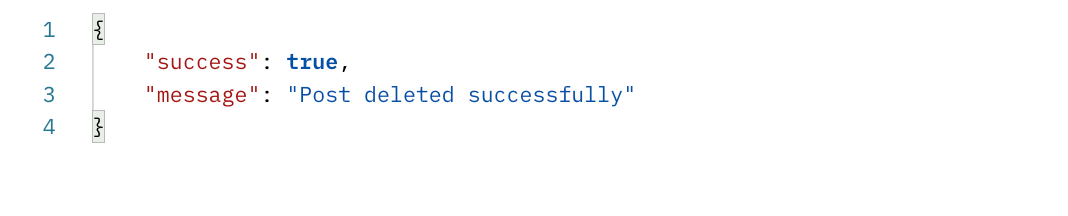
From your Postman, send a DELETE request to http://localhost:3000/api/notes/delete-note?id=_id_of_post_to_be_deleted. Ensure you replace _id_of_post_to_be_deleted with the id you want to delete. After successful deletion, you should receive the following response:
Conclusion
And there, you have a complete Node.js Typescript RESTFul API.
Now, you have gained confidence in Building Node.js Express REST APIs using TypeScript and MongoDB. Why not dive deeper and learn how to consume this API? This How to Build a Node.js Express Server for React Apps takes your ride to new heights.
I hope you found it helpful
Written By:
Joseph Chege
More Related Articles:
-

Using Prisma ORM with Node.js and PostgreSQL
Prisma is a Node.js and typescript ORM. an ORM that means Object Relational Mapping tool that can communicate with databases such as MongoDB, MySQL
Jul 29, 2023
-

How to Create React Apps With Node.js Express Server
React is a JavaScript-based framework for building fast and interactive UIs for mobile and web apps. Currently, it’s the most popular JavaScript
Jul 27, 2023
-

How to use CORS in Node.js With Express - Resolve CORS Error With Examples
CORS (Cross-Origin Resource Sharing) is a security feature implemented by web browsers to block web pages from requesting a different domain not
Jul 19, 2023
-

Guide to Creating CRUD APIs in Flask
Flask is a web framework for building web applications using Python. It is known for its lightweight and simple design. This makes it easy to get
Jul 28, 2023