How to Build and Implement Infinite Scroll in React Apps
Posted July 28, 2023

Have you ever created an application that serves user data from a backend server or an API? These APIs will have a huge list of data you want to display on your frontend applications. Loading this large load of data to your application can be overwhelming. Processing every request and displaying the whole data list will certainly take some time.
When a user sends an HTTP request to the API, the server will look up this request and send a response back to the user. Now assume this server is accessing resources to display a list of items. This means the server will take some time to process the request and send back the response. In such a case, you have limited options to speed up the process. This will affect the page’s overall performance, leading to a bad user experience.
As a developer, you want to make sure the application you build has the capacity to handy such scenarios. You want the application to load this items in small proportions to avoid performance issues. One of the solutions that you can use to implement infinite scrolls is to help you load large chunks of data based on how the user interacts with the web page.
Infinite scrolls fetch the data from the server and display it to the currently visible page. As the user scrolls down the page, more data will be loaded based on the user’s behavior. This way, accessing a large list item will be served almost instant to the user. This helps your application process any amount of data without creating performance overhead and ensuring good user experiences.
This guide will help you implement infinite scroll to your React applications.
Prerequisites
- Have Node.js runtime installed on your computer.
- Basic knowledge of creating and running applications using React.js.
Setting up a React application
To set up a React application, create a directory where you want your app to live. Then run the following create-react-app command inside this directory:
npx create-react-app react-infinite-scroll --use-npm
Use the --use-npm flag if you are using NPM are the package manager. If you are using yarn, use the flag --use-yarn. Once you run this command, a new react-infinite-scroll directory containing a basic React application will be created. Change directory to this newly created folder:
cd react-infinite-scroll
Then run the created React.js template:
npm start
Finally, test the application on this localhost URL.
http://localhost:3000/
This will serve you a basic React app implying that we are ready to jump to the next step.
Adding the application dependencies
To run this application, we will use a jsonplaceholder API to display a list of images From a JSON server.
To process requests to this API, go ahead and install Axios the using the following command:
npm i axios
Axios is a promised-based HTTP library for JavaScript. It helps you process HTTP clients for back frameworks such as React to display data on the browser.
Setting up a React component
Let’s dive in and implement the infinite scroll for react application. First, you need to create a react component. Everything in React is defined as a component. A component returns DOM elements that define your page UI. There are different components that you can create for your applications.
In this app, we will create a Class Component. It maintains some private information to that component and uses that information to describe the user interface. This allows you to optionally receive props or states as input and return HTML.
To set up this component, head over to the src directory and create a components folder. Inside this folder, create a ScrollComponent.js file and implement your infinite scroll as follows:
- Import the libraries this component will use. This include React Component React and axios from axios.
import React, { Component } from 'react';
import axios from 'axios';
- Create your class component as shown below:
class ScrollComponent extends Component {

};
At this point, any code will be added to this class component. Each code will be executed within the created components.
- Create the application states:
A state allows you to save values/data that change over time. A state can be an array of values, a Boolean, strings, objects, or any data the component needs. Below is how we will set up the state of this component:
state = {
    photos: [],
    loading: false,
    page: 0,
    prevY: 0
};
Here we are adding the following states:
photos: []- We are reacting data from the photos API. This state will hold an array of these photos.loading: false- A Boolean value to set when the state/ data will be available and loaded to the component.page: 0- This holds the current page that the user will be interacting with.prevY: 0- This will hold the data being scrolled based on the current page.
- Load the photos_
Create a getPhotos to load the images from the API. When a request to this API is made, we will set the loading state to true as the component waits for axios to process the request and return a response of photos from the API. Once we get the response of this data, the loading state is set to false.
//getting the photos
getPhotos = async (page) => {

    this.setState({ loading: true });
    let response = await axios
        .get(`https://jsonplaceholder.typicode.com/photos?_page=${page}&_limit=30`)
        .catch(console.log);

    //set the state.
    return this.setState({
        photos: [...this.state.photos, ...response.data],
        loading: false
    });

}
- Create a
componentDidMount()async method:
This will be called immediately after a component is mounted. In this case, we want to getPhotos() and load them to the current state on the component.
async componentDidMount() {
    await this.getPhotos(this.state.page);
    let options = {
        root: null,
        rootMargin: "0px",
        threshold: 1.0
    };
    this.observer = new IntersectionObserver(this.handleObserver, options);
    this.observer.observe(this.loadingRef);
}
- Set up the observers:
We need to observe the user interaction based on the current state defined above. Go ahead and create handleObserver. Here we will call the prevY if the user page has the last image of the current page visible. If the lastPhoto is visible, the photos states will be called again with new data based on the last photo id, which is the albumId.
handleObserver = (entities, observer) => {
    const y = entities[0].boundingClientRect.y;
    if (this.state.prevY > y) {
        let lastPhoto = this.state.photos[this.state.photos.length - 1];
        const curPage = lastPhoto['albumId'];

        //hold the last page being scrolled based on the current page

        //then fetch the data from the server
        this.getPhotos(curPage);

        this.setState({ page: curPage });
    }
    this.setState({ prevY: y })
}
- Display the loaded photos:
At this point, we have the photos ready to be displayed to the user. Use the render() method to render the user interface as follows:
render() {

    //css
    const loadingCss = {
        height: "100px",
        margin: "30px"
    };

    //changing the loading icon behavior
    const loadingTextCss = { display: this.state.loading ? 'block' : 'none' };
    return (
        <div className="container">
            <div style={{ minHeight: '800px' }}>
                {
                    this.state.photos.map((user => (
                        <img src={user['url']} height="100px" width="200px" alt="" />
                    )))
                }
            </div>
            <div
                ref={loadingRef => this.loadingRef = loadingRef}
                style={loadingCss}
            >
                <span style={loadingTextCss}>Loading...</span>
            </div>
        </div>
    )
}
- Finally, export this component so that it can be accessed across the application:
export default ScrollComponent;
Display the data
Everything is now ready. To render this component to the application, head over to the src/app.js file and add the following:
- Import the
ScrollComponentfrom components:
//component
import ScrollComponent from './components/ScrollComponent';
- Execute the component inside
returnas shown below:
function App() {
    return (
        <div className="App">
            <ScrollComponent />
        </div>
    );
}
Testing the application
The app is ready. Re-run your application to test if everything works as expected.
npm start
Test the application on this localhost URL.
http://localhost:3000/
You will be served with a list of images.
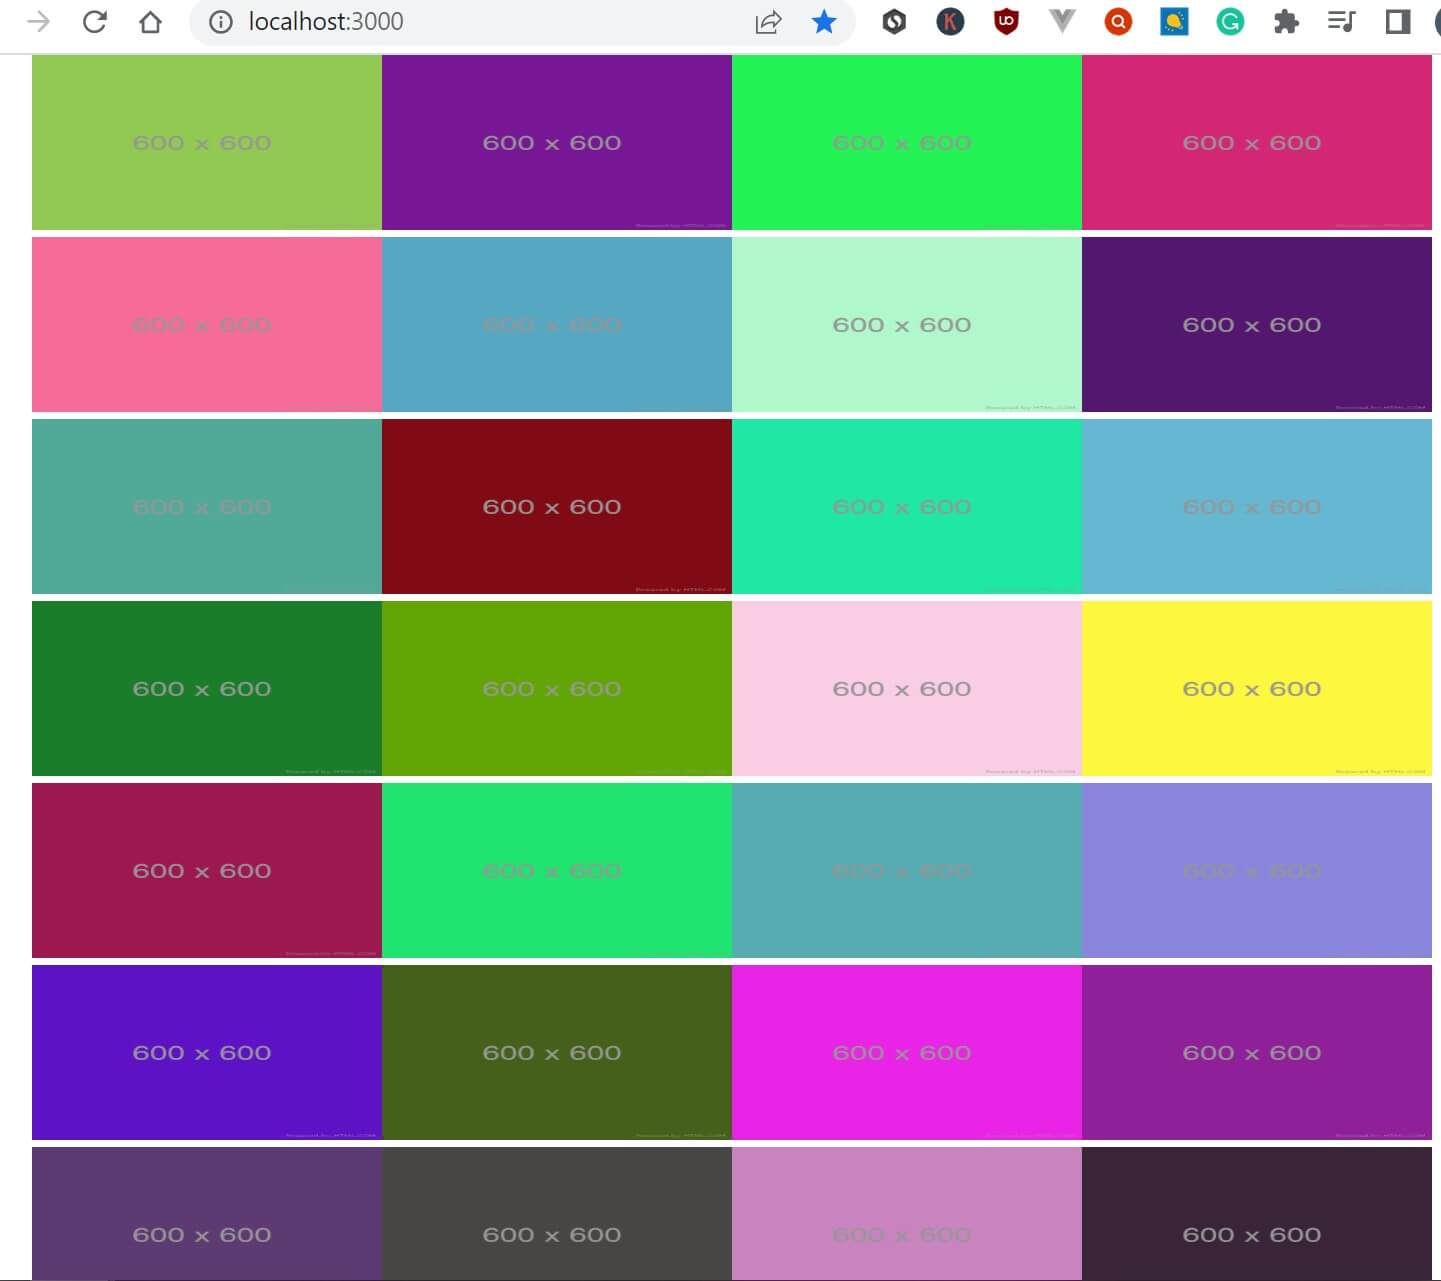
Note: if you scroll down, more images will be loaded. This confirms that the infinite scroll has been safely implemented in your application.
import React, { useEffect } from 'react'

function InfiScroll() {


    useEffect(() => {
        const imageContainer = document.getElementById('image_container');
        const loader = document.getElementById('loader');

        let ready = false;
        let imagesLoaded = 0;
        let totalImages = 0;
        let photosArray = [];

        let count = 5;
        const apiKey = '5nQJKlSgq8DeH5x00bHF5S3718BbUPDVehuN-oei-zQ';
        let apiUrl = `https://api.unsplash.com/photos/random?client_id=${apiKey}&count=${count}&query=ps5`;

        function imageLoaded() {
            imagesLoaded++;
            if (imagesLoaded === totalImages) {
                ready = true;
                loader.hidden = true;
                count = 30;
                apiUrl = `https://api.unsplash.com/photos/random?client_id=${apiKey}&count=${count}&query=ps5`;
            }
        }

        function setAttributes(element, attributes) {
            for (const key in attributes) {
                element.setAttribute(key, attributes[key]);
            }
        }

        // Create Elements For Links & Photos, Add to DOM
        function displayPhotos() {
            imagesLoaded = 0;
            totalImages = photosArray.length;
            // Run function for each object in photosArray
            photosArray.forEach((photo) => {
                // Create <a> to link to full photo
                const item = document.createElement('a');
                setAttributes(item, {
                    href: photo.links.html,
                    target: '_blank',
                });
                // Create <img> for photo
                const img = document.createElement('img');
                setAttributes(img, {
                    src: photo.urls.regular,
                    alt: photo.alt_description,
                    title: photo.alt_description,
                });
                // Event Listener, check when each is finished loading
                img.addEventListener('load', imageLoaded);
                // Put <img> inside <a>, then put both inside imageContainer Element
                item.appendChild(img);
                imageContainer.appendChild(item);
            });
        }

        // Get photos from Unsplash API
        async function getPhotos() {
            try {
                const response = await fetch(apiUrl);
                photosArray = await response.json();
                displayPhotos();
            } catch (error) {
                // Catch Error Here
                console.log(error)
            }
        }

        // Check to see if scrolling near bottom of page, Load More Photos
        window.addEventListener('scroll', () => {
            if (window.innerHeight + window.scrollY >= document.body.offsetHeight - 1000 && ready) {
                ready = false;
                getPhotos();

            }
        });

        // On Load
        getPhotos();
    }, [])

    return (
        <>
            <div className="loader" id="loader">
                <img src="./img/loader.svg" alt="loading" />
            </div>
            <div className="image_container" id="image_container">
            </div>
        </>
    )
}

export default InfiScroll
Conclusion
Now that you have mastered Consuming GraphQL API with React.js, why not dive deeper and take your React skills to a new height learning the Complete Guide to Creating Flask APIs with React apps and use Flask API to consume data with React. Get crazier learning this Definitive Guide to Internationalization in React.js using react-i18next. You will love it!
I hope you found this helpful. Happy coding!
More Related Articles:
-

How to Create React Apps With Node.js Express Server
React is a JavaScript-based framework for building fast and interactive UIs for mobile and web apps. Currently, it’s the most popular JavaScript
Jul 27, 2023
-

How to Create reCAPTCHA V2 With Google Captcha and React
CAPTCHA (Completely Automated Public) is a challenge-response test used to determine whether or not a user is human or a bot. CAPTCHAs are used as a
Aug 23, 2023
-

How to Test Next.js Applications with Jest
Tests are used to describe the expected behavior of a piece of code. Writing tests for your code allows you to ensure applications behave the way we
Aug 1, 2023
-

The Complete Guide to Creating Flask APIs with React apps
Integrating a Flask with a React involves setting up communication between the two using HTTP requests to send and receive data. You will create a
Jul 31, 2023